

Send emails from your WordPress website reliably with SMTP
With FluentSMTP, you can easily set up SMTP sending via your existing Microsoft 365 account - at no additional cost. This guide takes you through the setup step by step, shows you all the necessary settings in FluentSMTP and the Microsoft Entra Admin Center and explains what you need to pay attention to during authentication. This way, your website emails will reliably end up in your inbox and not in spam.
5 steps to reliable mail delivery via Microsoft Office 365:
For the interface between your website and the Microsoft servers, we use the free plugin "FluentSMTP", which you need to install as a first step.
Install FluentSMTP on your WordPress website
Install the "FluentSMTP" plugin from the WordPress repository and navigate to the settings (Settings - FluentSMTP - Settings).
Click on "+ Add Another Connection" to set up a new SMTP connection.

Select Microsoft there:

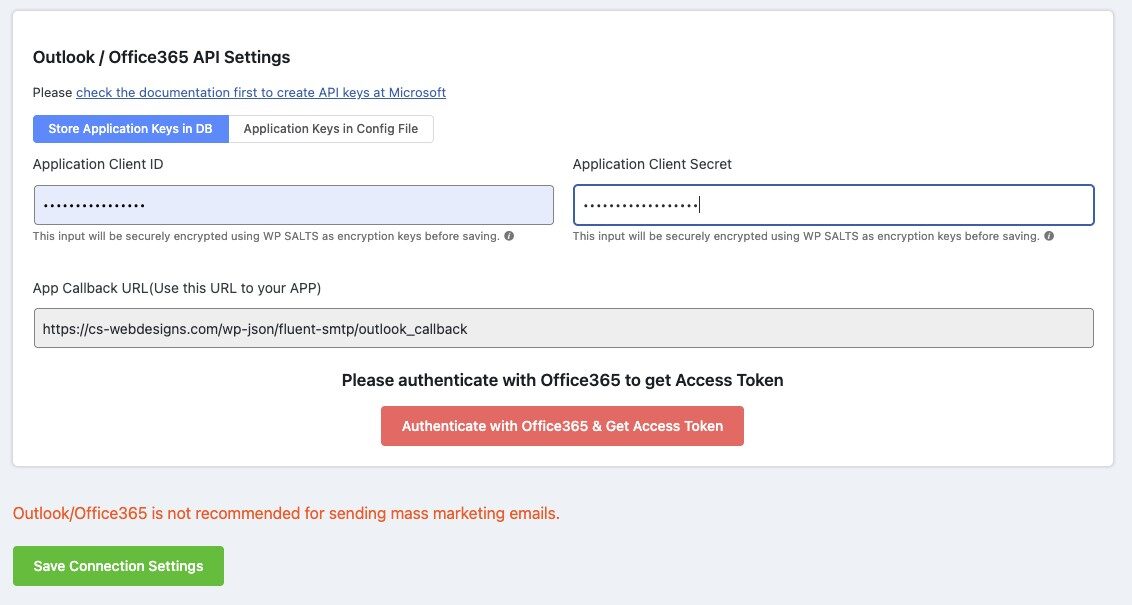
In the next window you have to enter your e-mail address, sender name and find the necessary App Callback URL, which you need for the configuration in Microsoft Office 365.

Leave this window open and open the Microsoft Entra admin center In the following you have to log in with your Microsoft O365 admin account.
Register app for SMTP delivery in Entra Admin Center
Navigate to Applications in the Microsoft Entra Admin Center, open "App Registrations" and create a new app for sending SMTP via "New registration":

For Register an application you need the fallback URL from FluentSMTP.

Important:
- Set up fallback URL in Authentication as a web platform
- Create account as multitenant (if not done when creating)
The app should now look like this:

Create Client Secret Key
Create a new client secret under Certificates & Secrets:

Important: Secret Value is the value we need in FluentSMTP! Unfortunately, FluentSMTP names this somewhat unclear/misleadingly as "Application Client Secret".
API Permission for O365 Exchange Online
Assign the app the authorization for O365 Exchange Online with SMTP.SendAsApp in the API Permissions and approve this "Grant admin consent":


Copy application ID and secret value for FluentSMTP
To establish the connection between FluentSMTP and the created app in MS Office 365, you need the Application ID and the Secret Value.
You can find the application ID in the app overview:

You can find the Secret Value in Certificates & Secrets:

Now enter the Application ID and the Secret Value in the FluentSMTP settings and click on "Authenticate with Office 365 & Get Access Token".
After clicking on "Authenticate with Office 365 & Get Access Token", a new Microsoft tab opens where you have to confirm access.
You will then receive the access token, which you must now insert as the last step in FluentSMTP under "Access Token" and complete the setup by clicking on "Save Connection Settings".

After clicking on you should test the SMTP dispatch via the "Email Test" tab:

If you have followed all the steps, you should now receive this success message and find an email in your inbox:

Conclusion
You have now set up SMTP sending via your MS Office 365 email and can be sure that your emails sent from and via your website will not end up in spam and will reach the recipient.
Please note: MS Office 365 is not suitable for marketing purposes (e.g. sending newsletters). For this, you should use marketing tools such as Bravo, Mailchimp etc.
0 Comments